The Playwright Test Results Badge: Monitor Your CI/CD Directly from Chrome
 By Faruk Hasan
Overview
The Playwright Browser Extension is a lightweight Chrome extension that shows your Playwright CI/CD test status directly from your browser toolbar — no more switching between tabs and dashboards. 100% free & open-source with failed test details, dark mode, GitHub Pages & AWS S3 support, AI-powered setup, and now a fully customizable polling interval (v1.13).
Latest Release Highlights
Set Up With AI — Skip the Steps Below
Using Cursor, GitHub Copilot, Claude, or any AI assistant? Just copy the prompt below and paste it into your AI chat. It will set everything up for you automatically — no manual reading required.
You are an AI coding assistant. I want to set up the Playwright Browser Extension integration in this repository so the Chrome extension can monitor my test results in real time.

Please do the following steps exactly:

## STEP 1 — Create the custom reporter file
Create a file called `generate_summary.js` in the project root with this exact content:

```js
// generate_summary.js
const fs = require('fs');

class SummaryReporter {
  onBegin(config, suite) {
    this.rootSuite = suite;
  }

  onEnd(result) {
    const summary = {
      schemaVersion: 1,
      passed: 0,
      failed: 0,
      flaky: 0,
      total: 0,
      startTime: new Date().toISOString(),
      isSummary: true,
      failedTests: []
    };

    if (this.rootSuite) {
      for (const test of this.rootSuite.allTests()) {
        const status = test.outcome();
        if (status === 'expected') summary.passed++;
        if (status === 'unexpected') {
          summary.failed++;
          summary.failedTests.push(test.title);
        }
        if (status === 'flaky') summary.flaky++;
      }
    }

    summary.total = summary.passed + summary.failed + summary.flaky;
    fs.writeFileSync('test-summary.json', JSON.stringify(summary, null, 2));
    console.log('✅ Automatic summary created: test-summary.json');
  }
}

module.exports = SummaryReporter;
```

## STEP 2 — Update playwright.config.ts
In `playwright.config.ts`, add `./generate_summary.js` to the reporters array. Keep any existing reporters. Example:

```ts
reporter: [
  ['./generate_summary.js'],
  ['list'],
  ['html'],
],
```

## STEP 3 — First, ask me: "Is your repository public, private, or an organization repo?"
Then apply the correct option below. Do NOT proceed without knowing this.

**Option A — Public Repository (No GitHub Pages needed)**
Use this ONLY if the repo is public. The raw GitHub URL is publicly accessible, so no deployment is needed.
- Create `.github/workflows/playwright.yml` that runs `npx playwright test` and commits `test-summary.json` directly back to the repo using `contents: write` permission and `[skip ci]` to prevent infinite loops.
- NO GitHub Pages setup is needed for public repos.
→ The extension URL will be the Raw GitHub URL of `test-summary.json` in the repo:
  `https://raw.githubusercontent.com/USERNAME/REPO/main/test-summary.json`
  Ask me for the GitHub username and repo name to build the exact URL.

**Option B — Private or Organization Repository (GitHub Pages deployment required)**
Use this if the repo is private or belongs to a GitHub Organization. The raw URL of a private repo is NOT publicly accessible, so the extension cannot read it directly. The ONLY solution is to deploy `results.json` to GitHub Pages, which serves it as a public URL even though the source code stays private.
- Create `.github/workflows/playwright.yml` that:
  1. Runs `npx playwright test`
  2. Copies `test-summary.json` into a `public/` folder as `results.json`
  3. Deploys the `public/` folder to GitHub Pages using `actions/deploy-pages`
  4. Requires permissions: `contents: write`, `pages: write`, `id-token: write`
- Remind me to enable GitHub Pages: repo Settings → Pages → Source: GitHub Actions → Save
→ The extension URL will be the GitHub Pages URL of the deployed `results.json` file:
  `https://USERNAME.github.io/REPO/results.json`
  This file is served publicly by GitHub Pages even if the repo is private.
  Ask me for the GitHub username and repo name to build the exact URL.

**Option C — AWS S3 (Alternative for teams already using AWS)**
Create `.github/workflows/playwright.yml` that runs tests and uploads `test-summary.json` to S3 as `results.json` using `aws s3 cp`. Uses secrets: AWS_ACCESS_KEY_ID, AWS_SECRET_ACCESS_KEY, AWS_DEFAULT_REGION. Ask me for my bucket name and region.
→ The extension URL will be the public S3 object URL:
  `https://BUCKET-NAME.s3.REGION.amazonaws.com/results.json`

## STEP 4 — When all files are created, end your response with this exact formatted summary:

---
### ✅ Setup Complete — Here's What To Do Next

**Files created/modified:**
- [list each file]

**Your Extension URL:**
[The exact URL to paste — no placeholders. E.g.: https://raw.githubusercontent.com/myuser/myrepo/main/test-summary.json]

**Remaining manual steps:**
1. [e.g., Go to GitHub repo → Settings → Pages → Source: GitHub Actions → Save]
2. [e.g., Push your changes to trigger the first CI run]
3. Open the Chrome extension → click the ⚙️ gear icon → paste the URL above into "Results JSON URL" → click Save
4. Wait for the CI pipeline to finish, then click the extension icon to see your live results

**You're all set! The extension badge will turn green when tests pass and red when they fail.**
---

## IMPORTANT RULES:
- Do NOT modify any existing test files
- Do NOT install new npm packages unless absolutely necessary
- If `generate_summary.js` already exists, check if it matches and skip if identical
- If `playwright.config.ts` already has a reporter array, merge — do not replace
- Always use `if: always()` in CI steps so results upload even when tests fail
What the Extension Does
Live Toolbar Badge
The badge stays visible at all times, providing a quick health check of your project:
Detailed Popup View
Click the extension icon in your browser toolbar to see a comprehensive breakdown:
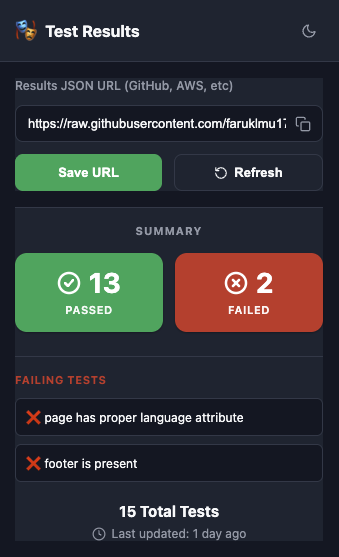
- Total number of tests executed
- Verified Passed tests
- Failed test counts
- Names of failing tests displayed directly in the popup
- Automated HTML Dashboard generation
- Last updated timestamp and Manual Refresh button
Quick Setup Guide (6 Steps)
Follow these steps to integrate the badge with your Playwright project today.
Step 1: Install Playwright
If you are starting a new project, run: npm init playwright@latest
- Choose TypeScript for the best experience.
- Choose true for "Add a GitHub Actions workflow".
This will create example tests and a default .yml file that you will replace in Step
4.
Step 2: Create the Summary Reporter
Create summary-reporter.js in your project root. This converts heavy reports into a
lightweight 1KB JSON.
const fs = require('fs');

class SummaryReporter {
  onBegin(config, suite) {
    this.rootSuite = suite;
  }

  onEnd(result) {
    const summary = {
      schemaVersion: 1,
      passed: 0,
      failed: 0,
      flaky: 0,
      total: 0,
      startTime: new Date().toISOString(),
      isSummary: true,
      failedTests: [] // 👈 NEW: Added array to hold names
    };

    if (this.rootSuite) {
      for (const test of this.rootSuite.allTests()) {
        const status = test.outcome();
        if (status === 'expected') summary.passed++;
        if (status === 'unexpected') {
          summary.failed++;
          summary.failedTests.push(test.title); // 👈 NEW: Push failing test name
        }
        if (status === 'flaky') summary.flaky++;
      }
    }

    summary.total = summary.passed + summary.failed + summary.flaky;
    fs.writeFileSync('test-summary.json', JSON.stringify(summary, null, 2));
    console.log('✅ Automatic summary created: test-summary.json');
  }
}

module.exports = SummaryReporter;
Step 3: Configure Playwright
Update your playwright.config.ts to include your new custom reporter.
// ... other imports
reporters: [
  ['./summary-reporter.js'],  // Add this line
  ['html'],                   // Keep your existing reporters
  ['list']
],
Step 4: Create GitHub Actions Workflow
Automate the test run and summary update. Ensure contents: write permission is
enabled.
name: Playwright Tests
on: [push, pull_request]

permissions:
  contents: write

jobs:
  test:
    runs-on: ubuntu-latest
    steps:
    - uses: actions/checkout@v4
    - uses: actions/setup-node@v4
    - name: Run tests
      run: npx playwright test
    - name: Update test results
      if: always()
      run: |
        git config user.name "Actions Bot"
        git config user.email "actions@github.com"
        git add test-summary.json
        git diff --staged --quiet || git commit -m "chore: update results [skip ci]"
git pushStep 5: Initialize Your Summary
Run your tests locally one time (npx playwright test) to create the
test-summary.json file, then commit and push it to your repository.
Tip: You can use the example tests that come with Playwright to verify the
badge immediately!
Step 6: Connect & Test
Copy the "Raw" URL of your test-summary.json and paste it into the extension
settings.
Monitoring Private Repositories
By design, this extension does not request your GitHub Personal Access Tokens. This keeps your account secure but means it cannot directly access private repository files.
Step-by-Step Configuration
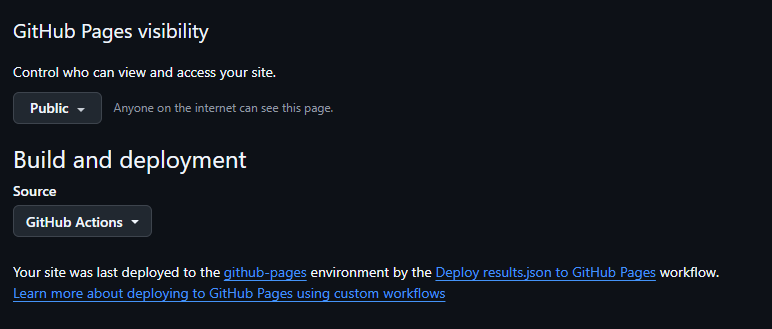
1. Enable GitHub Pages
Go to your repository Settings → Pages. Under "Build and deployment", set the Source to GitHub Actions as shown below.

2. Use the Complete Workflow
Copy and paste this workflow into .github/workflows/playwright.yml. It handles
testing, result commitment, and Pages deployment automatically while generating a beautiful HTML
dashboard.
name: Deploy results.json to GitHub Pages
on:
push:
branches: [main]
workflow_dispatch:
permissions:
contents: write
pages: write
id-token: write
jobs:
deploy:
environment:
name: github-pages
url: ${{ steps.deployment.outputs.page_url }}
runs-on: ubuntu-latest
steps:
- name: Checkout
uses: actions/checkout@v4
- name: Install dependencies
run: npm ci
- name: Install Playwright Browsers
run: npx playwright install --with-deps
- name: Run Playwright tests
run: npx playwright test
- name: Commit and push updated results
if: always()
run: |
git config user.name "github-actions[bot]"
git config user.email "github-actions[bot]@users.noreply.github.com"
git add test-summary.json
git commit -m "Update test summary [skip ci]" || echo "No changes"
git push
- name: Prepare Pages artifact (Summary and results)
if: always()
run: |
mkdir -p public
if [ -f test-summary.json ]; then
cp test-summary.json public/test-summary.json
cp test-summary.json public/results.json
else
echo '{"schemaVersion":1,"passed":0,"failed":0,"flaky":0,"total":0,"startTime":"","isSummary":true,"failedTests":["Summary file not generated"]}' > public/test-summary.json
cp public/test-summary.json public/results.json
fi
node - <<'NODE'
const fs = require('fs');
const path = 'public/test-summary.json';
const summary = JSON.parse(fs.readFileSync(path, 'utf8'));
const passed = Number(summary.passed || 0);
const failed = Number(summary.failed || 0);
const flaky = Number(summary.flaky || 0);
const total = Number(summary.total || 0);
const failedTests = Array.isArray(summary.failedTests) ? summary.failedTests : [];
const generatedAt = summary.startTime || new Date().toISOString();
const status = failed > 0 ? 'Failing' : 'Passing';
const escapeHtml = (value) => String(value)
.replace(/&/g, '&')
.replace(/</g, '<')
.replace(/>/g, '>')
.replace(/"/g, '"')
.replace(/'/g, ''');
const failedList = failedTests.length
? failedTests.map((name) => `<li>${escapeHtml(name)}</li>`).join('')
: '<li>No failed tests reported</li>';
const html = `<!doctype html>
<html lang="en">
<head>
<meta charset="utf-8" />
<meta name="viewport" content="width=device-width, initial-scale=1" />
<title>Playwright Test Summary</title>
<style>
:root { color-scheme: light; }
body {
margin: 0;
font-family: Segoe UI, Arial, sans-serif;
background: #F5F7FB;
color: #111827;
}
.container {
max-width: 860px;
margin: 40px auto;
padding: 0 16px;
}
.card {
background: #FFFFFF;
border: 1px solid #DBE3EF;
border-radius: 12px;
padding: 20px;
box-shadow: 0 8px 20px rgba(17, 24, 39, 0.06);
}
h1 {
margin-top: 0;
margin-bottom: 8px;
}
.meta {
color: #475569;
margin-bottom: 16px;
}
.grid {
display: grid;
grid-template-columns: repeat(4, minmax(0, 1fr));
gap: 10px;
margin-bottom: 20px;
}
.metric {
border: 1px solid #E5E7EB;
border-radius: 10px;
padding: 10px;
background: #F8FAFC;
}
.metric b {
display: block;
font-size: 22px;
margin-top: 4px;
}
ul {
padding-left: 20px;
}
a {
color: #0F766E;
text-decoration: none;
}
a:hover { text-decoration: underline; }
@media (max-width: 640px) {
.grid { grid-template-columns: repeat(2, minmax(0, 1fr)); }
}
</style>
</head>
<body>
<div class="container">
<div class="card">
<h1>Playwright Test Summary</h1>
<div class="meta">Status: <b>${escapeHtml(status)}</b> | Generated: ${escapeHtml(generatedAt)}</div>
<div class="grid">
<div class="metric">Total<b>${total}</b></div>
<div class="metric">Passed<b>${passed}</b></div>
<div class="metric">Failed<b>${failed}</b></div>
<div class="metric">Flaky<b>${flaky}</b></div>
</div>
<h2>Failed Tests</h2>
<ul>${failedList}</ul>
<p><a href="results.json">View raw results.json</a></p>
</div>
</div>
</body>
</html>`;
fs.writeFileSync('public/index.html', html, 'utf8');
NODE
touch public/.nojekyll
- name: Configure Pages
if: always()
uses: actions/configure-pages@v4
- name: Upload artifact
if: always()
uses: actions/upload-pages-artifact@v3
with:
path: public
- name: Deploy
id: deployment
if: always()
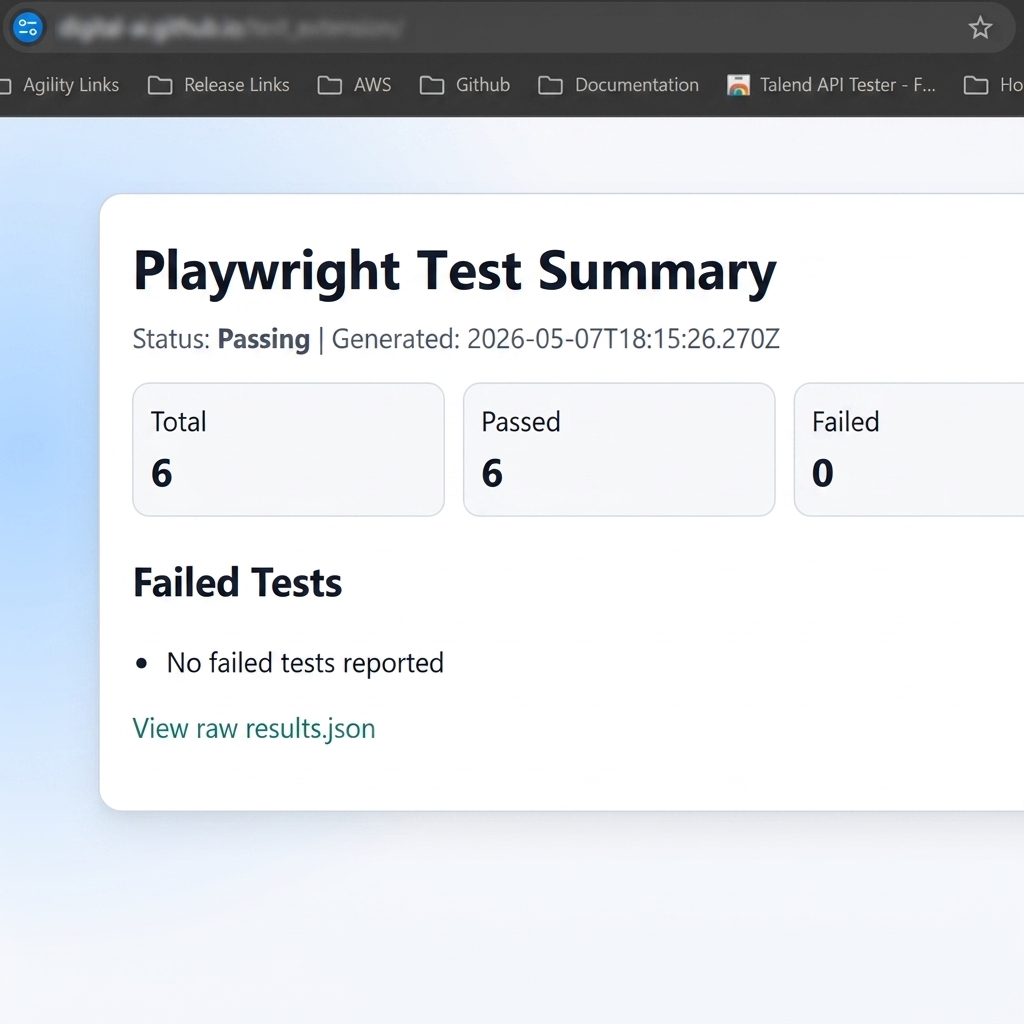
uses: actions/deploy-pages@v4The workflow above generates an automated dashboard like this:
3. Initialize Your Summary
Run npx playwright test locally, then commit and push the generated
test-summary.json file to GitHub.
4. Connect & Verify
Once the workflow finishes, you can verify the deployment status in your repository settings as shown below:
• ❌ Incorrect:
https://username.github.io/repo/
• ✅ Correct:
https://username.github.io/repo/results.json
Paste the results.json URL into the extension settings and click Save.
Alternative: Deploy to AWS S3
If you prefer AWS over GitHub Pages, you can deploy your test results to an S3 bucket. This gives you full control over your infrastructure and works great for teams already using AWS.
Step-by-Step AWS S3 Configuration
1. Create an S3 Bucket
Create a new S3 bucket (e.g., my-test-results) in your preferred AWS region.
2. Configure S3 Bucket Permissions
a) Block Public Access: Go to your bucket → Permissions tab → Block public access → Edit → Uncheck all boxes → Save → Confirm
b) Bucket Policy: Go to Bucket policy → Edit → Paste this policy (replace YOUR-BUCKET-NAME):
{
    "Version": "2012-10-17",
    "Statement": [
        {
            "Sid": "PublicReadGetObject",
            "Effect": "Allow",
            "Principal": "*",
            "Action": "s3:GetObject",
            "Resource": "arn:aws:s3:::YOUR-BUCKET-NAME/*"
        }
    ]
}
c) CORS Configuration: Go to CORS configuration → Edit → Paste:
[
    {
        "AllowedHeaders": ["*"],
        "AllowedMethods": ["GET", "HEAD"],
        "AllowedOrigins": ["*"],
        "ExposeHeaders": [],
        "MaxAgeSeconds": 3000
    }
]
3. Set Up AWS Credentials in GitHub Secrets
Go to your repository → Settings → Secrets and variables → Actions → New repository secret
Add these three secrets:
- AWS_ACCESS_KEY_ID
- AWS_SECRET_ACCESS_KEY
- AWS_DEFAULT_REGION (e.g., us-east-1)
4. Create AWS S3 Deployment Workflow
Create .github/workflows/playwright.yml with this content:
name: Deploy Test Results to AWS S3

on:
  push:
    branches: [main]
  workflow_dispatch:

jobs:
  test-and-deploy:
    runs-on: ubuntu-latest
    steps:
      - name: Checkout
        uses: actions/checkout@v4

      - name: Install dependencies
        run: npm ci

      - name: Install Playwright
        run: npx playwright install --with-deps

      - name: Run Playwright tests
        run: npx playwright test

      - name: Upload results to AWS S3
        if: always()
        run: |
          aws s3 cp test-summary.json s3://YOUR-BUCKET-NAME/results.json --acl public-read --content-type application/json
        env:
          AWS_ACCESS_KEY_ID: ${{ secrets.AWS_ACCESS_KEY_ID }}
          AWS_SECRET_ACCESS_KEY: ${{ secrets.AWS_SECRET_ACCESS_KEY }}
          AWS_DEFAULT_REGION: ${{ secrets.AWS_DEFAULT_REGION }}
5. Connect & Monitor
Your S3 URL will be: https://YOUR-BUCKET-NAME.s3.REGION.amazonaws.com/results.json
Example: https://my-test-results.s3.us-east-2.amazonaws.com/results.json
Paste this URL into the extension popup and click Save!
Workflow & Best Practices
The extension is designed to work with any CI tool including GitHub Actions, GitLab CI, Jenkins, and CircleCI.
if: always(). This ensures the summary file is updated even when tests fail, which is
exactly when you need the badge most!
Permissions Explained
- storage: To save your configured JSON URL locally.
- alarms: To handle the configurable background refresh polling (default 1 minute, adjustable up to 1440 minutes in settings).
- file access (optional): Required only if you're monitoring a
test-summary.jsonon your local machine.
Troubleshooting common issues
Check if test-summary.json
exists and contains "isSummary": true. Verify the URL is public or reachable.
Confirm your GitHub Workflow has
contents: write permissions and that [skip ci] is used to avoid
infinite loops.
Boost Your Testing Productivity
Get the extension for free and keep your test health visible at all times.